Monday

DIY pinwheel

During my last visit to IKEA I spotted these black and white placemats for only $1.50.  I wasn't sure what I could do with it, but I grabbed one in case an idea came to me.  Luckily I thought of something as we were strolling the aisles of the craft store later in the week.  My daughter is always drawn to those outdoor pinwheels they have and I immediately thought the placemat I picked up would be perfect for something like that.  

  These are really easy to make and especially fun for kids.  I remember making them when I was in elementary school and always loved it.  

Here's what you'll need:

A square plastic placemat (I used this one)
A wooden dowel (I got mine for $0.99 at the craft store)
A ruler
A nail
A hammer


I started by drawing two lines to create four equal squares which helps find the middle of the placemat. You can really skip that step and just do the two diagonal lines if you want to.  It doesn't have to be perfect.  


After you've drawn your lines, cut the diagonal ones toward the center, but not all the way.  Leave about an inch or so in the middle.  


Then you'll need to make a hole in the corner of each triangle for the nail to go through.


Then make a hole in the very center of the placemat and fold the corners of the triangles with the hole in them to the center.  Stick your nail through the holes and hammer it into the wooden dowel.  I ended up super gluing a button to the head of my nail because my holes were a little too big.


Since the placemats are plastic (and waterproof) I think these would be really cute for a fun patio space or even to use at wedding.  Wouldn't they be fun lining the aisle at an outdoor wedding?

Friday

Friday Faves

I'm back at it this week with a few of my Friday Faves.  Hope you enjoy!

1. I would love to make this bag be for the farmer's market or grocery store!  Could be a fun gift too!


2.  I came across this pouf the other day and was instantly drawn to it.  I'm loving palm prints for summer and the contrasting trim is the perfect finishing touch.


3.  I think this balloon needs to make an appearance at our next party.

4.  Have you seen the new Oh Joy line for summer?  It makes me want to have a party just so I can use it!

5.  A few of these tassel placemats sewn together would make a pretty cute pillow.


6.  If you follow me on instagram you already saw this, but I came across the cutest black and gold stuff at Hobby Lobby the other day.  A lot more glamorous and a little less chevron/burlap than the stuff they normally have. :)  I loved those lamps and think that black/gold canvas could be a fun DIY.  


While I was there, I also came across some Lindsay Letters canvases and prints.  I was lucky enough to  win one of her canvases a while back and have been hooked ever since.  They were running low on them and out of a lot of them, but they said they'd be getting more in.  I'll definitely be going back!


Seen anything great lately?  I hope you have a wonderful weekend!

Friday Faves

I'm starting a new series called Friday Faves.  I'm not sure I'll do it every Friday, but I see so many great things I want to share and I think it will be a fun way to share them with you!  So here we go!


1.  This teepee is finally on sale!  I've had my eye on it forever and think it would make the perfect spot for summer reading!  Can you ever go wrong with black and white?


2.  I'm a huge fan of white dishes and their versatility.  Love the faceted edge on these.

3.  These jellies (in gold of course) are a summer staple in our house.  They go with everything and are virtually impossible to mess up!  I buy a pair for my daughter every year!


4.  I'm trying to stop and smell the roses a little more this summer because life goes by way too fast!


5.  I think I found the inspiration I needed for the driftwood light fixture I want to make.  I love the rustic meets modern look.

6.  Peonies are my favorite.  They are oh so pretty and smell heavenly.  I picked mine up at Trader Joe's this week and may need to go back for round two! :)


*contains affiliate links

Have a wonderful weekend!

Monday

DIY string art

If you follow me on instagram you already know what I was up to this weekend.  We had a ladies retreat for our Sunday School class at a lake in our area.  It was such a nice time of relaxation, getting to know each other better, encouraging one another, and indulging in some good food (thank you Ashley!)!  Of course we had to throw a little craft time in there too.  My sister, who headed everything up, asked me to come up with something that would be simple and inexpensive to do.  I racked my brain for a while and eventually decided on string art.  String art has been around forever and is so simple to create.  It's also really cheap.

I gathered all of our supplies from Hobby Lobby and did a test run to make sure everything would work well.  I did the outline of North Carolina with a heart around the area where we live.  It's far from perfect, but it was a fun little project.


I couldn't help myself and had to dress up the railheads with a gold Sharpie.  I also used string with gold flecks in it to add another element.


It's probably pretty obvious, but you basically just hammer nails into the wood in the shape that you want and then connect the nails randomly with some string.  

Some people did letters for their children or their last name.  And some went with shapes.  My sister actually had the idea to add a little white paint over the top for a whitewashed effect, so a few people went that route too.


Ironically, the house we were staying in had some vintage string art of it's own as you can see in the background of this picture.


I think these would be great mixed in with an eclectic gallery wall or even as a replacement for a wreath on your front door!  Older kids would probably love doing this too!

Friday

Painting Laminate Furniture

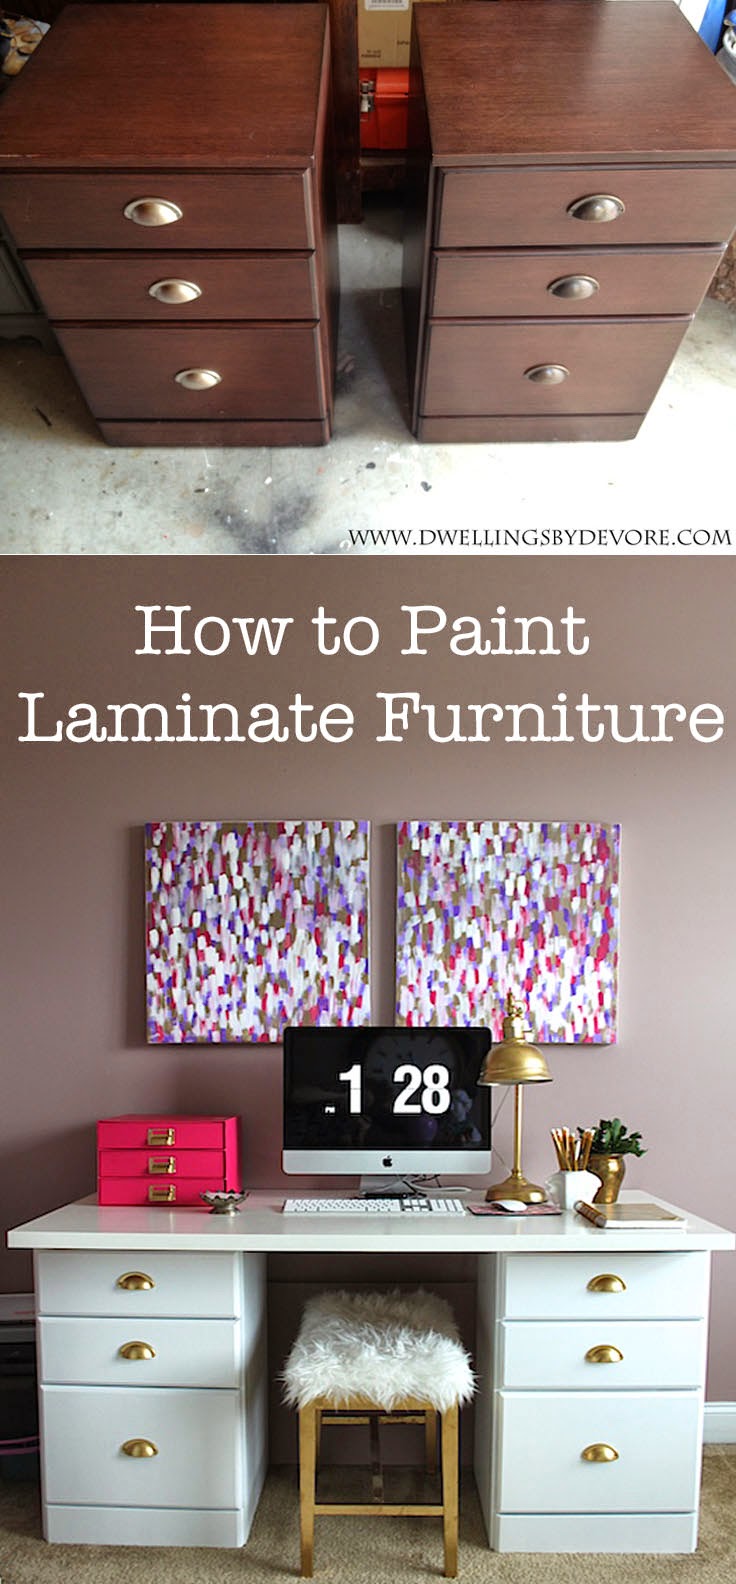
I've been wanting to switch up the bases of my desk/sewing table for a little while now.  They just weren't that functional.  I thought they would be when we first bought them, but I've really missed having drawers.  We actually sold my desk that I made out of door a little while ago, so this is the only desk in the room now.  I loved that desk, but we just didn't need it and if we end up moving we didn't want to have to move it.  I'm on a bit of a "get rid of everything" spree right now.  Anyways, I was looking for new bases and I knew I wanted something like a filing cabinet so that we could use it for important documents and then use the other drawers for storage.    

I loved this one that I found at Homegoods.  Isn't it the prettiest shade of pink?  But they only had one and the price was a little steep, at least for me.

Then a few weeks later I came across this pair at a yard sale.  I originally wanted something metal, but I knew I would regret passing these up, especially for the price.  They were part of one of those awkward corner desks and thankfully the guy sold me just the bases.  The bottom drawers on both have the option to hold hanging files and then the top two drawers are just extra storage.


They look like wood, but they are actually a laminate material like most generic office furniture.  I wasn't sure how to go about painting them, but then Kilz sent me this awesome Adhesion Bonding Primer that will stick to just about anything.  I was excited to give it a try.  


I must say I was pleasantly surprised with how well it adhered to the laminate.  I didn't even sand before I got started.  I just gave them a good wipe down.  Then, I used a foam roller to apply it and it worked great.  I did two coats of primer and then followed up with two coats of semi gloss white paint.  The cup pulls were actually different on the two bases, you can kind of tell in the before picture.  I thought that was odd, but I didn't mind because I knew I wanted them to be gold anyway.  I gave them a few light coats of Rustoleum Gold Metallic Spray Paint.  


I'm already loving having so much more storage than before!  Now I just need to find a narrow office chair that will fit between the bases.  I'm thinking a ghost chair like this one might be the perfect solution!


Wednesday

Monogrammed Succulent Coffee Cup

Last Christmas my hubby bought me this gold monogrammed coffee cup.  It was the perfect gift for me.  The gold/monogram combo is right up my alley.  I was so excited about it, but then I realized it wasn't going to be very useful for my morning cup of tea or coffee.  As a mom of a toddler, I end up reheating my coffee more times than I can count each morning and if you've ever had a cup like this you know that you can't microwave it.  The gold finish will set off a mini fireworks show in your microwave.  Not really the way I want to start my day.  So I set out to find another use for it.


I settled on using it as a succulent planter and I love it!  It's adds a nice touch of greenery to my nightstand.


Check back later this week for a small office update!