It's hard to believe the holidays are over and another year is coming to an end. I have lots of goals and ideas for this blog for the next year and hope you will continue to follow along! Here's a little recap of some of my favorite posts from 2013.
Monday
DIY gold heart pillow
Just popping in with a quick DIY today. I'm probably going to be taking a little time off between now and the new year to spend time with family and relax. I may pop in if I find something I just can't wait to share, otherwise I'll see you in the new year!
I've been searching for the perfect pillow to go in my daughter's room. I found a few that were OK, but nothing really did it for me. That's usually why I end up DIYing things. I can't find what I'm looking for in the store or if I do find it it's way out of the budget. This pillow is simple to make and adds the perfect amount of glam.
I started with this fabric. I bought it here. I never thought I'd be googling "gold pleather" to make something for my home, but I really love it! It has a nice sheen to it, but it's not over the top shiny. If gold isn't your thing there are lots of other colors available. Silver would be pretty too!
After seeing this pillow on Etsy I decided to go with a heart shape. So I folded the fabric in half and roughly drew half a heart shape. I cut it out while the fabric was still folded so that the heart would be symmetrical. I wanted to keep it simple so I just cut out two white square pieces of fabric for the background of the pillow.
Then I pinned the heart to one of the pieces of white fabric.
and stitched it in place
Then I added a zipper using this tutorial. I was always afraid of zippers before I saw Mandi's tutorial, When I saw it, it clicked and totally made sense. I actually think it's easier and less time consuming than doing envelope closures.
I bought a yard of the gold pleather so I have plenty leftover for future projects. I'm actually thinking about making a solid gold lumbar pillow for our bedroom. Why not?
I also just want to say thank you to all of you who read and follow along! I hope you all have a wonderful Christmas!
Friday
Last Minute Decor
I'm a constant tweaker. I am always changing things up in my home, tweaking, moving, painting...Well it should come as no surprise that I do the same thing when Christmas rolls around. It's never really done. I just move things around and add things. Well a few weeks ago we had some dreary weather and I got cabin fever so I added a few more holiday touches. They were easy and free!
I started with this chalkboard in my kitchen. I wanted something festive, but it was already the middle of December so my advent idea wasn't going to make the cut. I settled on a chalkboard tree after seeing this free printable. I used the printable as a guide and roughly sketched something similar to create my tree. Once the tree was done it needed a little oomph. I thought about adding some twinkling lights, but sadly there's no outlet nearby. So I turned to the next best thing, glitter. I actually used this glitter wrapping paper from Walmart ($4 a roll) to make my ornaments. It's a great deal and I can think of so many things to use it for. I might check back after Christmas and grab a few rolls when it goes on sale. Although $4 isn't really going to break the bank.
Anyways, back to the ornaments. I used my silhouette to cut out the circles, stars, and the topper. You could easily do this with a circle or star punch from any craft store or just good old scissors. Then I taped my shapes to the wall.
The white card stock background looked a little boring so I drew some random black circles on it with a sharpie.
Hope you all have a wonderful weekend!
Wednesday
Jingle Bell Ornament
I'm happy to be participating in the Jingle Mingle today with a few other talented bloggers. If you saw my post yesterday you know that I've already done a little bit of crafting with jingle bells. This is another really easy one.
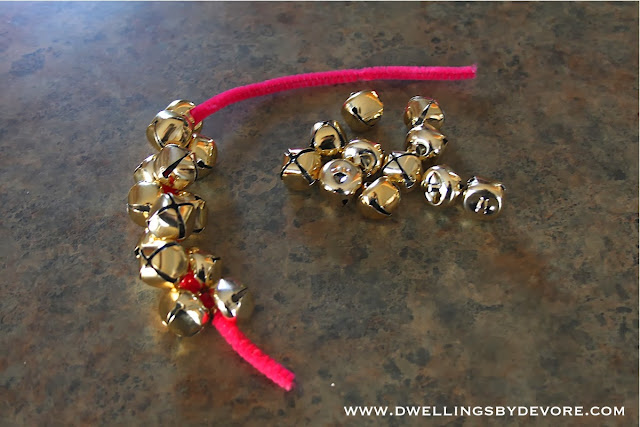
Start with some jingle bells, ribbon, and a pipe cleaner. I went with a bright pink pipe cleaner because that's we had and I thought it would be fun.
Then, I just started stringing the bells on the pipe cleaner and rotating them as I went so most of the gaps would be filled in.
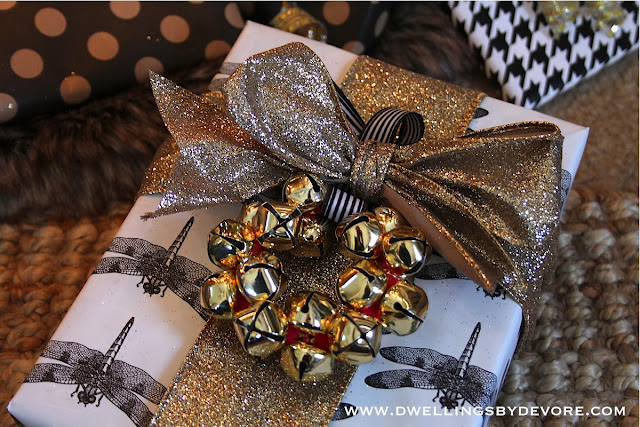
Once you get it as full as you like it, twist the pipe cleaner together at the end to form a circle and add your ribbon. It's the simplest little jingle bell wreath ornament. It's also doubling as a musical instrument for my toddler.
I like how the pink is peeking out and mixing with the gold and black and white.
You can also use it as a fun addition to your gift wrap.
Be sure to check out the other pretty jingle bell ornaments from these ladies:
Tuesday
jingle bell craft
Jingle bells are everywhere this time of year so I grabbed a few supplies and made a simple craft with them. The great thing about this craft is that it took less than 5 minutes and cost less than $5. Those are my kind of projects.
I found my supplies at Hobby Lobby, but you could find them at pretty much any craft store. Of course I had to go with gold jingle bells because we all know I love gold and it just felt more festive to me.
I feel silly even explaining this because I just glued the jingle bells to the cardboard letter with hot glue and that was it! I told you it was simple. The bells wanted to roll around a little bit so I just held each one for a second until the glue dried and then moved on to the next one. It looks really festive mixed in with my holiday decor, but it could really transcend into my decor the rest of the year too!
I think this would also be a fun hostess gift too. Everybody loves a handmade present!
Be sure to check back tomorrow for another fun jingle bell project. I'm participating in the jingle mingle with some talented bloggers!
Monday
Simple Holiday Table Setting
I really love the natural look mixed with a little bit of gold and glam. This weekend I got inspired to mix those two things together and create a simple holiday table setting that will last from Christmas to New Years. I shopped my house and a nearby green space to pull this together for next to nothing.
My mom and I found these mirrored chargers several years ago at Target during their after Christmas clearance sale. We hardly paid anything for them and ended up using them in my wedding.
I dressed the mirrored chargers up a little with a gold sharpie paint pen. These are great to have on hand for so many projects. It gives the chargers a fun, festive look but it is easily reversible.
And of course I had to throw some gold glitter in there. I think we'll be sparkling the rest of the year!
Are you guys ready for Christmas? It has totally snuck up on me this year!
Thursday
Blogger Stylin' Home Tours: Christmas
I'm so excited to be sharing my Christmas decor today as a part of the blogger stylin' home tours Christmas edition hosted by Lindsay at the White Buffalo Styling Co. Lindsay has done such a great job putting this all together! If you are visiting from Cuckoo 4 Design, welcome, I hope you enjoy the tour! I kept things pretty simple with our holiday decor this year and tried to use most of what I already had with a few DIYs mixed it. I included a few links for some of the DIYs below the coordinating picture.
To keep the fun going, be sure to hop on over to Makely Home and check out Lindsay's beautiful home!
Here's the full schedule if you want to follow along:
Monday:
Lindsay - The White Buffalo Styling Co.
Roeshel - DIY Showoff
Jess and Monica - East Coast Creative
Laura - Finding Home
Jesse - Scout and Nimble
Sarah - Sarah M. Dorsey Designs
Angela - Number Fifty-three
Gwen - The Makerista
Brittany - Brittany Makes
Cassie - Primitive & Proper
Caitlin - Desert Domicile
Jenna - Rain on a Tin Roof
Sarah - The Thriftress
Carolyn - Sweet Chaos Home
Jamie - So Much Better with Age
Wednesday:
Emily - Jones Design Company
Jamie - C.R.A.F.T.
Lucy - Craftberry Bush
Michelle - Decor and the Dog
Whitney - The Curtis Casa
Kristin - Bliss at Home
Summer - Simple Stylings
Sarah - Lacquer and Linen
Kelly-View Along the Way
Jenna - SAS Interiors
Chris - Just a Girl
Julia - Cuckoo 4 Design
Jennifer - Dimples & Tangles
Friday:
Shauna - Perfectly Imperfect
Traci - Beneath My Heart
Jen – The Chronicles of Home
Jennifer - Tatertots and Jello
Kristin - Hunted Interior
Eileen - A Creative Day
Gabbi - Retro Ranch Reno
Shannon - Shannon Berry Design
Lakeitha - Lakeitha Duncan
Kristen - KFD Designs
Jessica - Dear Emmeline
Sarah - Royal Marigold
Carmel - Our Fifth House
Danika - Gorgeous Shiny Things
Subscribe to:
Posts (Atom)


.jpg)


