This project was inspired by this beautiful necklace I saw on Etsy. Isn't it cool? One thing I love about the inspiration necklace is the vintage elements she used. Mine is a little different based on the materials I was able to find.
Here's the inspiration piece.
And here's mine. I made one for my sister with her boys and hubby and one for me with my little girl.
So how do you make this? Since a picture is worth a thousand words I tried to take as many pictures/screen snapshots along the way as I could. I started by making the silhouettes. I am not so computer savvy when it comes to photo editing but this was fairly easy to figure out through some trial and error. I know there is a way to do this in photoshop, but I don't have photoshop and the software I used is for this was free. I should also mention I did this on a mac but I think it would be fairly similar on a PC.
First I downloaded Pinta, a free photo editing software. I don't know much about it because this is the first time I've used it, but it worked well for this project.
So, open up your software and start with a profile picture.
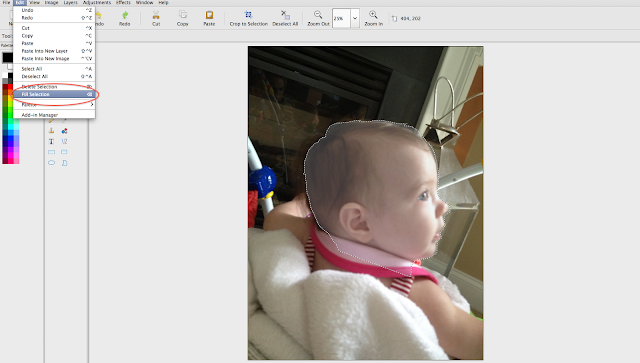
Then, you are going to use the Lasso tool to select the silhouette.
Once the silhouette is selected, you are going to fill it with a solid color. Click Edit - Fill Selection.

You can fill the selection with any color to make the silhouette any color you want, but I went with classic black. To change the color just use the palette on the left hand side.
Once you've changed the color you will need to copy the image. (Edit - Copy; or Command C) Then, Open a new image by clicking "New" up in the top left corner. You will have a blank page like this.
Then you will paste your image using either Edit - Paste or Command "v"
You'll see it's a little rough around the edges because the image is slightly larger than the original. If you want a larger silhouette to frame, it will need to be more precise, but if you are making a small silhouette for a necklace it won't matter because the image is going to end up being much smaller. Nonetheless, I cleaned up the edges a little bit using the eraser tool.
That's all there is to making the silhouette. Now, you're just going to save it to the desktop.
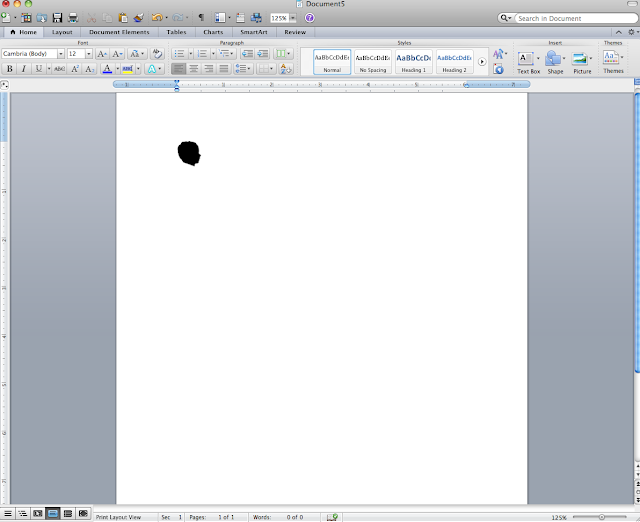
Then, open up a blank document in Word or Pages (I used Word) and drag your image into the new document.
Once it's in the document, you will just click it so you can resize it and make it smaller.
You will see the box surrounding the image, click on one of the corners and drag it to make it smaller. I made mine about 0.5" by 0.5" When determining how big you want it for the necklace, keep in mind that the glass has a bit of a magnifying effect so it will actually appear slightly larger than it is.
Now you're done with this part, just print the image. I printed mine on white cardstock. You don't want to print it on regular printer weight paper because it will be too thin and the glue will bleed through.

Now, onto the necklace. I ordered my supplies from this Etsy seller. I chose this set because it came with ten pieces which would allow me to make several necklaces. You can also pick up these supplies at Hobby Lobby or Michaels. I think a variation in shapes and sizes would be nice too.
The other thing you will need is glue. I used E6000 glue (from Hobby Lobby but they sell it several places).
So once you've printed out your silhouettes, glue your glass pieces to the paper. Just place a dab of glue in the center of the glass and then press firmly onto the silhouette making sure the glue spreads out evenly and you get out any air bubbles. Press firmly for about 60 seconds. Then, this is very important, wait about 24 hours for them to get really good and dry before you move to the next step. Ask me how I know this is important? Because I was being impatient and trying to do it all at once and the paper got too wet and I had to start over. So, once they are good and dry, rough cut them so they will be easier to cut.
Then, carefully cut around the edges and glue them into your metal bezel (apparently that's the fancy name for the metal piece)
Let them dry again and you're ready to wear your beautiful new necklace with pride! I think these would make great gifts too.


3 comments:
love it...... you're so resourceful. I am downloading Pinta at once.
thank you!
laura
I am so excited you shared this! I have wanted to do one but never took the plunge to figure it out. Thank you so much for sharing! Your daughter is adorable!
What a clever idea! I love this, especially for my friends who are new moms. Great job!
Post a Comment
Thank you for your sweet comments, they make my day!