Wednesday

That Last Bit of Wax

I've decided to go a little green and start reusing my burnt out candle containers.  I usually would just throw them away, but if the jar is in good shape or if I just really like it and can find another purpose for it I hold on to it.  I also like to save the leftover wax if it's a candle that smells really good, like my favorite anthro candle.

If it's a soy based candle the wax will usually just pop right out when you run a knife around the edge and then I just use soap and water to get the excess wax out.  However, if the wax is a little more stubborn, I just bring some water to a simmer in a small sauce pan.  I place the candle jar in there when I start heating the water to avoid any cracking.  Once the water starts to slightly boil I remove it from the heat and let it sit for a few minutes.  The wax should pop right out in one large piece.


It's hard to tell from the picture, but the container on the left has some nice gold detail on it.  I think it will be nice filled with some cute bath soaps for our bathroom.  I've got plans for the other jar that I'll share soon.  Speaking of that jar, that Ivy and Mistletoe candle smells great!  It's a great holiday scent, sort of an evergreen smell.  I picked it up at Marshalls.


Once I remove the wax, I save the chunks of leftover candle wax to use in my scent warmers.


Here's some burning in my Scentsy warmer.  If it's a good, strong candle the wax will last a while in my warmer and best of all it doesn't go to waste!


Do you reuse your candle containers?  

Friday

Ikea Rast Hack

I think it's safe to say the Ikea rast has been hacked about a million times, it's just so hackable.  It's basically a solid wood blank canvas, the perfect bones for a makeover.  So when my sister mentioned she would like some new nightstands for her room that were inexpensive yet provided a decent amount of storage, my first thought was natural the rast.  

Of course we couldn't leave them in their natural state so that's where I come in.  She's taken plenty of pictures for me, so I do DIY projects for her.  It works out well for both of us.  She basically gave me free reign to do whatever I wanted to do with them.  If they were for me I probably would have done something a little more modern like this or this, but she has more of a cottage look going on in her home.  So I went for something a little aged and a little more rustic looking.  I also wanted to make sure it coordinated with this gray and white duvet she already had from IKEA.

Here's a reminder of what it looks like straight out of the box.


So, I basically just painted them white after several coats of primer, unfinished wood sure does suck up the paint.  Then, I glazed them with some gray paint I had leftover from another project.  As for the glazing, you basically just mix some water in with your paint.  I think I did about half water, half paint.


Then, just wipe it on with a rag. (I used my hubby's old t shirt and that worked well for me)  I also like to work in small areas.  


Just wipe it on and then with a damp (that's important) rag wipe it off.  If your wiping rag isn't wet the glaze won't really be workable so you want it to be damp.  You may need to rinse it out a few times as you go so things don't start looking too muddy.


There's really no magic formula as to wear you put the glaze.  I usually just go a little heavier around the edges and work it until it looks good to me.

We went with a more rustic knob to go with the more rustic finish.  These knobs from Hobby Lobby did the trick.  They were half off, so for $2.50/each they were a steal.  I love the added texture and interest they bring.


If you don't have a Hobby Lobby near you, you can check out their knob selection online.  It's my go to source, makes me want to hoard drawer pulls.

Anyways, onto the finished product.


Tuesday

The No Phone Zone

Hope you all had a nice weekend, my hubby had yesterday off so we spent the weekend in the Charleston, SC area.  I love that area so much.  The scenery, the homes, the shopping, it's all so beautiful!  Anyways, we have started a new thing in our home.  It may sound silly to some, but it has made a huge difference for us.  With social media being such a big part of our lives these days it's easy to become consumed with the internet, texting, etc.  So, in order to help us "unplug" at the end of the day we started a thing called "the no phone zone."  When my hubby gets home from work we both put our phones in a small basket in our kitchen until we go to bed.  Of course if we need to make a phone call or we are expecting a phone call that's fine, but we spend way less time on our phones looking at blogs, facebook, etc.  With all these things right at our fingertips, it's so easy to be sitting right next to each other and yet be totally unengaged.  It's also something we wanted to be aware of as our daughter is getting older.  We don't want to model that for her.  As silly as it may sound it really does help to have a designated place for our phones.  It only took me a few minutes and a few dollars to make.

I started out with this thrifted basket for $1.


Then I hot glued this small frame from the Michaels dollar section (I'm addicted) onto the front of it and just printed "no phone zone" on a piece of cardstock to go in it and "the no phone zone" was born.


Thursday

Paper Straws

Paper straws are one of my favorite things.  They are so fun and the perfect addition to any party.  I knew I wanted to find some for my daughter's first birthday party (can't believe she's already almost a year old!!) but as always didn't want to spend a fortune.  I've been keeping an eye out at local party supply stores and Marshall's (I've seen them there before) but haven't really come up with anything.  I found some online but didn't really want to pay shipping.  Well, I just happened to stop by Michaels the other day and they had some in their dollar section.  I was pleasantly surprised that a set of 18 was only $2.  I love their dollar section, you can always find something in there you need.

They had an assortment of colors but the quantities were dwindling, so if you are looking for some you might want to head on over soon.

(my straws from Michaels)

Here's some more paper straw inspiration


Have you used paper straws?  My guess is that they may taste a little cardboardish, but the cuteness factor wins out in this case!

Wednesday

Gliders

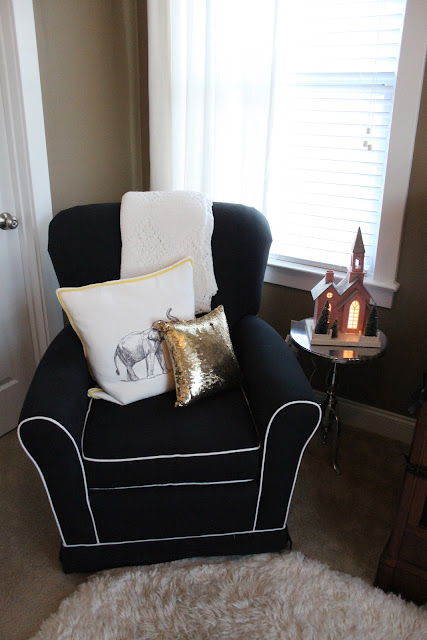
It's hard to find a glider for a nursery (or for any room) that looks decent but doesn't cost a fortune.  We ended up finding the one for my daughter's nursery at Walmart.  It was the lowest price I could find without sacrificing style.  I get asked a lot about the quality of it.  We are still very happy with it.  It has held up really well despite many hours of rocking and feeding in it.  I wasn't sure what to expect, but have been pleasantly surprised with it.

Here's a picture from Christmas and you can see it still looks practically brand new.  Here is the source for it at Walmart.


Here are some other great gliders from Walmart and other sources around the web if you are looking for an inexpensive option for your home.

love the sleek, modern look of this one and there are several different color options.


love the contrast of the stripes and black piping


If you are looking for a rocker and don't necessarily need a glider, this one is a great deal at $159 and you can purchase different colored slip covers that can easily be removed for cleaning.


and this one is by far the best deal I've found on a glider that is still stylish, $249!  I'm not sure how long it is on sale for (regularly $429) but this is a great deal for sure. 


This is not a sponsored post.  I just found some great deals on a furniture item that, in my opinion, can be difficult to decorate around and wanted to pass them along in case any of you are in the market for one.

Thursday

Target's new collection

Have you checked out Target's new Modern Cottage Home Decor collection?  It's been all the buzz around the blog world lately and I love it.  I think it's one of my favorite decor lines that Target has carried.  


I got in on the action and picked up two of these pillows the other day with a gift card I had from Christmas.  I've mentioned before that I'm slowly phasing out the burnt orange in my living room and kind of revamping things a bit.  I just grew tired of the orange, 5 years is a long time for me to keep things the same color scheme.  I've decided to go with a black, white, tan, gold, brown color scheme.  These pillows provide just the touch of black that I was looking for and remind me of the Caitlin Wilson pillows that I adore.


Pardon the poor iphone picture

Here's some dreamy spaces that have gotten me inspired to go with this color scheme.  Even though the spaces are all fairly neutral in color, the layers of texture make them so visually interesting.


this home tour from Lonny is so beautiful


Sarah Richardson via Centsational Girl

Wednesday

Pillow Talk

One of the common questions I get asked is where I purchased the pillows for my master bedroom.  Most of them were purchased from Homegoods or I made them myself which makes it difficult to provide sources.  I ran across these today on Joss and Main and thought they were perfect.  They're such a great shade of yellow, not too gold and not too bright.  Just thought I'd pass it along.


and I LOVE this one


Who doesn't love a good throw pillow?  They're right up there with lamps and mirrors, you can never have too many.


Tuesday

Living Room Gallery Wall

I love the collage look that many gallery walls have.  In fact that's the look my stairway gallery wall has going on.  However, I wanted something a little more simplistic to go in our living room.  In the busyness of life, it took me far too long to finally print nice pictures of my daughter for our home.  Thankfully my sister is an amazing photographer and she hooked us up with some great family shots and pictures of our little one.  I didn't want to spend a fortune on this wall but needed all the frames to be the same size.  I was planning on getting some of the Ribba frames from IKEA (which would work great), but I found these at Michaels for around $7 each after a great sale and a coupon for an extra 25% off.  Side note: you can find some great deals at Michaels when you hit them at the right time.  They often have coupons that you can use to get additional discounts on sale items.  Anyways, back to the frames.  I needed 8, but I planned on painting them so it helped that they all didn't have to be the same color.


Since I'm going for a little more glamour, I sprayed them all with some Rustoleum gold metallic spray paint (my go to gold spraypaint)  Then I just arranged them in two rows.  Something about the tone of the gold looks a little bit weird against the color of our walls so I may tone them down a bit with some glaze or rub and buff.  I'm waiting until all the other changes I have planned for in there are complete before I decide.

I like how it turned out and that we can easily change out the pictures as time goes by.


more living room updates to come!

Sunday

faux fur pillows for less

I've been wanting to switch up some of the pillows in my living room for a little while now.  I'm slowly changing things out to make the room feel fresh.  Pillows are one thing that you can change out to make a big impact for a fairly minimal cost.  I wanted to add something with some texture so I started looking at faux fur pillows.  I found some at a few different stores for around $25/each, but couldn't bring myself to spend $25 a piece on something that was pretty trendy and I would probably get tired of.  To some that may not seem like a large investment but I just couldn't bite the bullet.  Then we went on a random girls shopping trip to Garden Ridge and I spotted these faux fur pillows.  I was pleasantly surprised at the $12.99 price tag.  I grabbed two of them and they work perfectly.  I basically got two for the price of one.  Garden Ridge is kind of hit or miss sometimes, but I have stumbled upon some nice pillows there from time to time in up to date fabrics.  


p.s.-you'll notice my spraypainted pillows are still going strong, I am pleasantly surprised.