Monday

DIY marbled tray

This tray was sort of an experiment.  It's kind of fun sometimes to work on something and just see what happens because you have nothing to lose.  Sometimes those are the best projects.  I am automatically drawn to anything acrylic/lucite looking so I was instantly drawn to this tray at the thrift store.  It was only a few dollars and extra trays are always good to have around.  I didn't love the yellow tone the base had going on and it was a little scratched but that didn't stop me.

At first I thought about adding scrapbook paper or wrapping paper to cover the bottom, but then I remembered the ornaments I did a while back and thought I would try the same technique on this tray for a marbled look.

So, I taped off the edges since I wanted to keep some of that lucite look going.


Then, I primed the bottom of the tray, not sure that step is necessary but just wanted to make sure the paint would adhere.  Then, this is the fun part, just pour some paint into the tray.  I just used leftover white latex paint I had in the garage.


Add a second color of paint.  Just put several dollops of paint on top of your first color.  You can use any color combination you want, just keep in mind what color the two colors make when blended together.


Time to start swirling your paint together.  Just keep turning the tray until you get the whole thing covered with paint and you are happy with the pattern.  The more you swirl the more mixed and marbled your tray will look.  You want to have a thin layer of paint covering the whole surface.  If the paint seems to stop moving and you need to add more paint you can.  I had to do that a few times.  Don't worry if there seems to be too much paint in there, we will get to that in a minute.  As tempting as it may be to use a brush to get things moving a little faster try to refrain.  It will mess up the marbled look.


Once the surface is completely covered and swirled to your liking you can get rid of some of the excess paint.  I just cut a small section out of the tape where the tray handle was so I could pour off some of the excess paint.  


Once most of the extra paint is poured off, lay your tray flat to dry.  I waited until the paint was mostly dry to remove the tape.  I ran an exacto knife along the edge before I removed the tape so the tape wouldn't pull up the paint.  


  Since the layers of paint are a little thicker than a normal layer of brushed on paint it will take a little longer to dry.  I just set mine out in the sun for a few days to air out and cure.  If you wanted to, you could add a clear top coat for extra protection and shine.


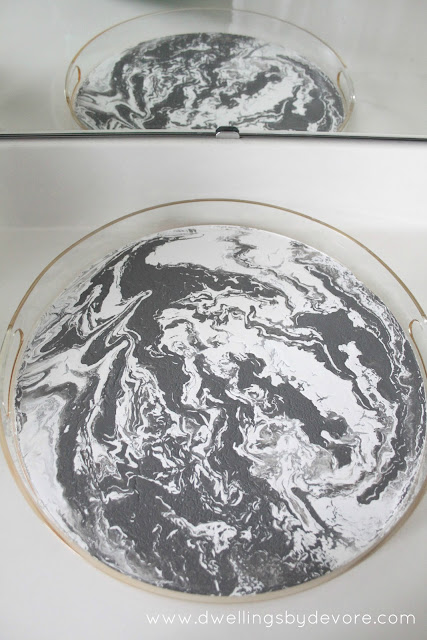
You can still see a hint of that yellow in the plastic, but I don't mind it.


If you're looking for a tray to try this out on, check out this one from CB2.  This would also be great to try with a shadowbox frame like I did for my DIY lucite tray.

Friday

DIY Abstract Lamp

My in laws gave me this lamp when they were cleaning out their garage.  I hardly ever turn down free and it had great lines so I gladly brought it home with me.  I especially loved the gold base.  I knew it was just a few coats of paint away from being pretty.  It sat in my garage for a while until I came across this beautiful DIY lamp on Made by girl.  It was just the inspiration I needed.


So, I started with this.


Then, I taped off the parts that were gold and primed and painted the rest white.


Then I just added some random black brush strokes and sealed it with a coat of Rustoleum clear gloss for a shiny finish.  Super easy and done in a day.  I like the punch of pattern that it adds and that it's not your typical solid color lamp.


Wednesday

Thrifted Light Box

I'm not really sure what the technical name for this is, but I'm calling it a light box.  Original right?  I think it was used for signs.  I found it for $3.99 while thrifting and immediately thought of the awesome DIY light up sign that Mandi from Vintage Revivals did.  I tested it to make sure it worked and it did.  I thought it would be a fun little addition to my daughters room.

As you can see from the picture, the plexiglass was scratched up pretty badly.  I had originally planned to paint the back of the plexiglass, but decided to paint the front instead to cover up the scratches and other marks.  If it didn't work I planned to just buy a replacement piece of plexiglass from Home Depot, but thankfully it worked which was great because it saved me around $15.

Anyways, I just unscrewed the top and removed the glass and that awful faux wood frame.  Even though it was gold already I spruced it up with a fresh coat of gold spraypaint to cover up some of the years of wear and tear.


Then, I sprayed the back of the plexiglass with frosted glass spray paint so it would have more of a soft glow.  I did about three coats.  


Then, I cut out the word "shine" using my silhouette machine.  You can make your own letters using vinyl and letter stencils.

I adhered my letters to the front side of the plexiglass since I planned to paint the front side.  If you were painting the back side you would need to mirror your letters and adhere them to the back side so that the word would be displayed correctly.


Then, I got excited and forgot to take pictures of the next few steps, but it's pretty self explanatory.  I primed the plexiglass with about 3-4 coats of primer.  I wanted it to be opaque so that the only light you would see shining through would be through the letters.  I decided to go with a pretty coral color to keep things bright and girly.   The color I used was behr juicy passionfruit.  I just bought a sample of it since I knew I wouldn't need much.  I used a foam roller to apply the paint to get a nice even finish.  You could also use spray paint, but the color I wanted wasn't available in spray paint form.  Once the paint was dry, I removed the vinyl letters.  There's something therapeutic about that, it's like removing all the painters tape when you're finished painting a room.


Fluorescent lighting isn't my favorite, but with the frosted glass you really can't even tell it's fluorescent.


I'm working on a DIY version that's super easy that I'll share soon.

Monday

Emerald Green Faux Bamboo Mirror

I don't have anything earth shattering for you today, but I did try out a new spraypaint color and gave a mirror a little makeover.  I must admit I'm a sucker for faux bamboo so when I came across this mirror at Goodwill I couldn't resist.  The first color that came to mind when I started thinking about painting it was Emerald green.  I have loved that color so much even before it became the color of the year.


So I primed it to cover up the yellow and make sure that design at the top didn't peek through.  Then I gave it a few coats of krylon emerald green spraypaint.  This was my first time using this particular shade of krylon and I really liked the way the color turned out.  It dries super fast too which is always nice when you get a little impatient like me.


ah the power of spray paint


Sadly the scale isn't right for this space so I'll be sending this to my booth.  Tried any new spray paint colors that you adore?

Thursday

Updating IKEA Ritva curtains with Greek Key Trim

I love IKEA for many reasons.  They have great, affordable finds that can easily be transformed and made to fit your own personal style.  One of my favorite IKEA finds are their curtains.  It's hard to find long curtains (95" or longer) without paying a fortune.  Most big box stores don't even carry longer lengths.  I particularly love the Ritva curtains and recommend them to a lot of my clients.  They are simple and have a nice subtle texture.  They come in a few different colors, but I prefer the white.  They can also be easily updated if you want more of a custom feel.  I don't like to make a huge commitment with my window treatments because I change my mind frequently.  I'd rather make bold choices in the small details that can easily be changed.  However, my office was starting to look a little too white.  The curtains were white, the sewing table is white, the rug is white, the filing cabinet is white...you get the idea.  So, I decided a good place to add a punch of color and pattern would be the curtains.  I started off thinking I would paint them to look something like this.


But, the more I thought about it the more I thought it might look like I just let my one year old go crazy with my curtains.  I even did a little trial run, but it did not go so well.

So, here's the before.  Really unstaged, poor photo quality, but it will make the after that much better.


I started with this premier prints fabric from fabric.com.  You'll notice it looks a little red and the white looks a little cream.  Well, something I like to do when I'm searching for fabric is to do a google image search of the fabric.  A lot of times you will find the fabric used in a home, for a pillow on Etsy, or on a blog and you can see it in different lighting and get a better feel for what it really looks like.  I did that with this fabric and found a pillow on Etsy that revealed that the fabric was much more pink/white than the fabric.com photo which is what I needed.  So, I went with it. 


 I wanted to add some greek key trim, but I couldn't find any in the color I wanted or the size I wanted and it was a little pricey.  I knew I wanted it to be wide so it would make a big impact.  So, I ordered 3 yards of fabric and just cut it into strips.  Then, I turned the edges under ironed them and pinned it to the edges of my curtains.  The trim ended up being about 4 inches wide.  I also have a decent amount of fabric leftover to use for other projects.  I ended up paying around $20 for all the fabric I needed.


And here they are all finished.  I decided to add trim to both sides of the curtain panels for added impact.  I think this would look awesome on a plain white shower curtain too.  My husband walked in and said, "oh cool, it looks like Roman times."  I said thanks?  I'll take that as a compliment and he assured me that he meant it as one.

Let me just say that taking pictures of windows is really tricky so these are a little blown out.  Cate did a  post about how to fix this with online photo editing software, but I haven't had a chance to try it out yet.


I love having a glass desk, but it leaves me with very little storage.  So, I picked up this desk drawer organizer at Garden Ridge.  The pulls were originally silver, but of course I had to spray them gold.


Monday

DIY router box cover

Sometimes it's easy to look at all the design magazines and think "what do they do with all their real life stuff?"  Like printers, and cable boxes, and wireless routers for their computers.  Sometimes they probably just take them out for the pictures or have special closets to hide away all that stuff, but in our house that's not reality.  So, I'm slowly finding ways to work around those things that aren't that aesthetically pleasing, but are necessary to everyday life.  I mentioned before how we installed an IKEA bookcase to work with our living room electronics and then I used foam board  to hide the cords in my office.  Now, it's time to tackle something that has always bugged me.  The router in our office.  It's a small little thing and something most wouldn't even notice, but it bugged me.  So, I set out to do something about it.

I started out with:
2 pieces of wood from Hobby Lobby (3/8 x 36")
1 Union Jack Aluminum Sheet (I purchased mine from Hobby Lobby with a 40% off coupon)

I decided I was going to create a small box to conceal the router.  I chose the aluminum sheet due to the fact that most electronics due better with good air circulation.  There are lots of different patterns of metal sheeting to choose from, I just preferred the union jack.  

First, determine the measurements you need to have in order to conceal whatever it is you are trying to conceal.


Then, measure and mark your wood. I just used my miter box to cut the pieces to the size I needed them to be.


You are going to create two frames.  I forgot to take a picture of them, but you'll be able to tell what I mean from the pictures below.  I just stapled the frames together on both sides to hold them together.  It would be great if you also created 4 vertical pieces to connect the two frames (I ran out of wood), but it's not really necessary because the metal sheeting holds everything together.  

So, then just measure and cut the metal sheets down to the size you need them to be.  The package recommends using tin snips to cut the sheeting, but I just used an old pair of scissors and they worked great.


Then, I used a little hot glue to attach my metal pieces to the two frames.  One problem I ran into was the hot glue got a little thick and dried too fast.  It might be better to use super glue or E6000.  This box isn't going to be moved or handled much so I think it should hold up fine.   


After I attached all the metal pieces, I gave it a coat of gold metallic spraypaint and put it in place.  It's not perfect, but it works well for us.


I also updated the filing cabinet with some Gold Leaf Rub 'n Buff.  It was actually my first time using it and I was pretty pleased with the results.  The hardware on this cabinet cannot be removed so spraypainting it wasn't an option.  It's a little hard to tell the difference in the pictures, but on the left you can see the nickel finish and on the right is the rub 'n buff finish.  It's a little change that makes a big difference in my opinion.


Disclaimer: I am not an expert at storing electronics so please use your own discretion when it comes to storing your electronics.  

Friday

DIY Thread Holder

I mentioned before that I got an embroidery machine for Christmas.  Well, that meant I needed to find some way to store all the thread, some sort of thread holder.  When I opened the box of colorful thread I knew it was too pretty to hide away somewhere.  So, I started brainstorming ideas for how to display it without it looking too crafty.  I thought all the beautiful colors could actually serve as artwork if displayed in the right way.  

Later that day, I was making my rounds at Goodwill and I found this rack.  I'm not sure what it was originally, sort of looks like a really narrow towel rack?  Anyways, I had a feeling it would be perfect and may even work with these dowel rods and blocks I got from Hobby Lobby.  And the best part?  It was $2.99.  

I got home and started gluing the dowels with the blocks into place to hold the thread and realized it just wasn't going to work.  The holes weren't drilled straight and the dowels were crooked so it looked really wonky. 


So, onto plan B.  I decided I probably wouldn't really need the dowels to hold everything in place so I just took them off.  Then, I gave it a coat of gold spraypaint to make it look more glam and less industrial.

I have 40 spools of thread and they just so happened to all fit perfectly, it's a miracle.  They are just resting there now but the ledge is almost as wide as the spools and I don't plan on slamming any doors or anything so they shouldn't fall off, fingers crossed.  If they do start falling off I'll probably just buy some thicker dowel rods, cut them to size, and super glue them into place.   


I love that I can see them all now and know exactly which colors I have.  It also adds a nice punch of color.


If you want to make something similar and don't come across one of these at Goodwill, the same look could be accomplished with some 1 x 2's from Lowe's.  Just cut them to size and screw them in place.  You could actually customize it that way to make it as large or small as you want.  

Hope you all have a wonderful weekend!

Edited to add:

Thank you to Tracey who commented to let me know that this is actually a CD rack from Ikea.  So, if you'd like to recreate this thread holder, then hop on over to IKEA and pick one up for $7.99.  It's the Lerberg CD/DVD wall shelf.