Thursday

Spoonflower

The secret is out that spoonflower now offers wallpaper that you can design yourself and that's easily removable.  I think it's a brilliant idea.  I would love to try this somewhere in my home.  Maybe on a focal wall?  Have any of you tried it yet?

Here are just a few bold patterns that I'm loving that would be great in small doses.  I'm on a black and white kick so you'll notice a theme going on here.


I would love to try my hand at designing my own.  I'll let you know how it goes if I attempt it.  

Friday

IKEA highchair hack

This is such a simple IKEA hack.  All you need is a little spraypaint and a vinyl decal.  I love the look of the IKEA antilop highchair.  It has simple clean lines that doesn't scream baby.  It will fit in with most decor as much as a highchair can fit in and at $25 the price is perfect.  However, I wasn't too crazy about the gray legs and decided I'd glam it up a bit for the princess.

Here it is originally.


It comes unassembled like most everything at IKEA but it's super easy to put together.  You just click the legs in place and you're done, but before I did that I gave the legs a quick spray paint makeover.


I wanted to keep the balls at the bottom white so I just taped those off with some frog tape.


Then I gave them a few coats of my favorite gold spray paint.  


Then I just whipped up a quick vinyl decal with my silohuette machine.  If you don't have a silohuette you can find lots of great decals on Etsy for a few dollars.


I'm really happy with how it turned out and my daughter loves it too.  You can use it with or without the tray.  If you remove the tray it will slide right up to the table which is kind of neat and I love that it doesn't look super highchair-y.

Done any IKEA hacks lately?

Thursday

A Christmas Tour

This year we kept things pretty simple with our Christmas decor.  I used things we already had or made things like our stockings from materials we already had on hand.  

I went with a silver and gold theme for the tree this year.  If you look closely there are less ornaments at the bottom of the tree, hmm...wonder how that happened?  I did put non breakable ornaments on the bottom half of the tree in case little fingers decided to grab them, which as you can see they did.


For my wrapping this year I decided to keep it simple with some fun leopard print paper from Hobby Lobby found in the Christmas wrapping section.  The ones with the pink bows are for my daughter.  I'm pretty sure those sparkly things will be her favorite part of the whole morning.


Every year we add a new ornament to the tree.  I loved this Lenox ornament when I saw it.  I love that it's a manger scene and that it symbolizes the true meaning of Christmas.  I was also pretty happy that it was on sale for $4.50 at Ross.  It normally retails for around $30 so it was a great deal.


I'm linking up to the nester's tour of homes.

Wednesday

DIY stockings

Since we added a new member to the family this year, that also meant we needed to add another stocking to the mantel.  I wasn't totally in love with the stockings I've used the past few years and I only  had two of them.  I looked into buying some but they were a little pricey especially when I knew they'd be pretty easy to make.  I started out with some fabric I had in my stash.  I got it from Garden Ridge a while ago, I think it was $5 for 2.5 yards.  It's a nice heavy material and the pattern is textured, almost like a chenille.  Side note, if you are looking for upholstery material check Garden Ridge, it's hit or miss  but I've found some great fabric there.  Onto the stockings.  I traced the stockings I already had to get the basic shape.  You will trace one side going one way and the other going the opposite way so they will match up when it's time to sew.  I just used some chalk to trace mine so I wouldn't be left with any marks.  


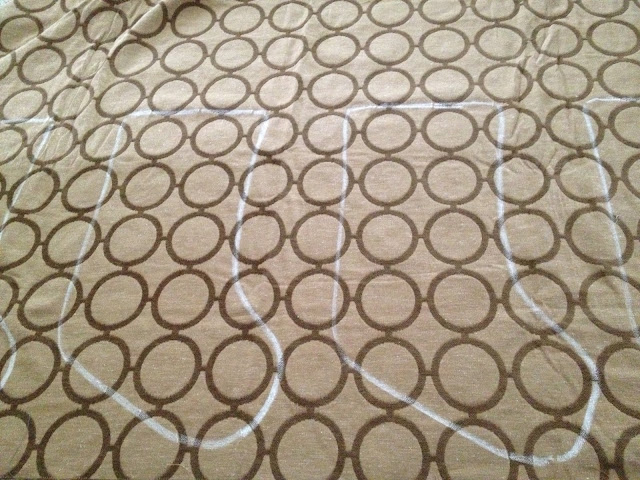
I did the same for the lining, you could make this really easy by not lining them but I chose to go with the lining.  See how they are facing opposite directions?


Here they are all matched up and ready to be sewed.  Pretty easy, put the right sides together, sew around the edges leaving the top open.  Do the same with the lining.  Then stick the lining inside the stocking and sew around the top edge.  It was late at night when I did this so I forgot to take pictures after this point but it's pretty self explanatory.   


I chose to add cuffs to the top so I could embroider them one day if I wanted to.  For that part I just sewed a basic rectangle that was long enough to wrap around the top of the stocking. Then I just stitched it to the top of the stocking.  Sorry for the vagueness, as they say a picture is worth a thousand words and I wish I had remembered to take some more.  So here's the finished product.

Did you notice I painted the wall behind the fireplace?  It was burnt orange before and was just bugging me, plus it always clashed with my Christmas decor.  So this year before I got to decorating I painted it the same as the rest of the room.  I'm so glad I did.  You wouldn't think it would make much of a difference but it looks so much better.  Next on my long list of things to do is to prettify the TV and figure out a way to get those electronics off the mantel.


I just hung them with Command hooks since the mantel was already pretty crowded.


The center one is for my daughter.  I just added a clip on fabric flower and stuck the antlers in the top for fun.  They are actually just a headband so I can easily take them out.  


 Do you make your own stockings or have a go to place to get them from?  Can you believe Christmas is less than a week away?!?