Wednesday

Another Easy DIY shirt

Since having a baby I've been a little more into sewing which at least helps me a little with my fabric obsession.  I love fabric so much but with decorating you eventually run out of places to use it, but with clothes, there's no such thing as too many clothes, right?  For this project I used a little trim.  This could be adapted for a little girl or even an adult t-shirt.  

I started with this trim (technically it's quilt binding but it works great for this project) from Hobby Lobby and a plain white onesie.  It's pretty inexpensive, I think around $2.50 a yard and even cheaper if you use the weekly 40% off coupon.


source (mine is red but it comes in a few different colors)

and a plain onesie


I just pinned it and stitched it with a zig zag stitch and that's it


I added it to a bib I made for July 4th for a little extra detail


I think she likes it :)


Last call for Jennifer S to claim your prize for the Birdaria giveaway!  Please contact me via email dwellingsbydevore(at)gmail(dot)com to claim your prize by Friday July 27 or I will have to choose another winner.  Thank you!!


Thursday

Lamp turned vase

It seems with thrifting most of the time, you have to keep an open mind and think of things having multiple purposes.  For example, you may find a great piece of furniture with fabulous lines but the color is all wrong or a pretty tablecloth that could be turned into great curtains or in this case, a funky lamp that can be turned into a contemporary vase.  I found this lamp and thought it was cool in a funky vintage way but it needed some work.  Definitely needed to be rewired and the base was all rusted.  It was a good deal so I picked it up anyway and figured I could make it over.  Well, I went to take it apart and realized the glass portion alone would make a pretty cool vase.  So, I packaged up the rest of the pieces to save for a later lamp project and cleaned out the glass.  Now, I have a one of a kind vase and a  lamp kit for another project.  Of course, there is a hole in the bottom where the rod went through so I couldn't fill it with water for real flowers but it works great just as it is or with some fake stems in it.

I forgot to take a "before" picture before I took it all apart but it looked a little something like this, only the condition wasn't nearly as good as this one from ebay.  The base of mine was a little different and very rusted but this gives you an idea.


and here's my new vase...


like I said before I packed away the lamp "innards" for another project, buying inexpensive lamps ($2-$3) at the thrift store is way cheaper than buying a lamp kit at Lowe's (around $10).  Pretty good deal for a few dollars don't you think?  


so, next time you are in the market for a vase, why not check the lamp aisle?


Friday

Summertime mantle

I love the decor that goes along with summertime, light and airy interiors filled with coral and all things beachy.  I'm sure you've caught onto the fact now that I love driftwood, coral, seashells, anything nature inspired.  I keep most of these things in my home year round, but really kick it up a notch around this time of year.  

I wanted to spruce up my mantle a little and make it a little more summery without spending a lot of money, so I shopped the house and garage and pulled it together.

I've had this large painting in the garage for a while, I bought it for a steal at Salvation Army a long time ago but just left it sitting until I could figure out what to do with it.  I originally planned to paint over it but thought it fit right in with my beachy decor.


This is one of my favorite finds ever, I found it at Tuesday Morning of all places.  It's a vintage seltzer bottle.  The all metal ones sell online for up to $200!  Guess how much I paid for it?  $12.50, It was marked $25 which I thought was a steal but it rang up $12.50, I took it as a sign and bought the rest of the ones they had in stock. 


seashells gathered on our vacation last year to Oak Island, I've got some DIY plans for these one day...


Happy Weekend!  Hope it's a great one!

Monday

Silhouette Necklace Tutorial

This project was inspired by this beautiful necklace I saw on Etsy.  Isn't it cool?  One thing I love about the inspiration necklace is the vintage elements she used.  Mine is a little different based on the materials I was able to find.  

Here's the inspiration piece.


And here's mine.  I made one for my sister with her boys and hubby and one for me with my little girl.


So how do you make this?  Since a picture is worth a thousand words I tried to take as many pictures/screen snapshots along the way as I could.  I started by making the silhouettes.  I am not so computer savvy when it comes to photo editing but this was fairly easy to figure out through some trial and error.  I know there is a way to do this in photoshop, but I don't have photoshop and the software I used is for this was free.  I should also mention I did this on a mac but I think it would be fairly similar on a PC. 

First I downloaded Pinta, a free photo editing software.  I don't know much about it because this is the first time I've used it, but it worked well for this project.  

So, open up your software and start with a profile picture.


Then, you are going to use the Lasso tool to select the silhouette.


Once the silhouette is selected, you are going to fill it with a solid color.  Click Edit - Fill Selection. 


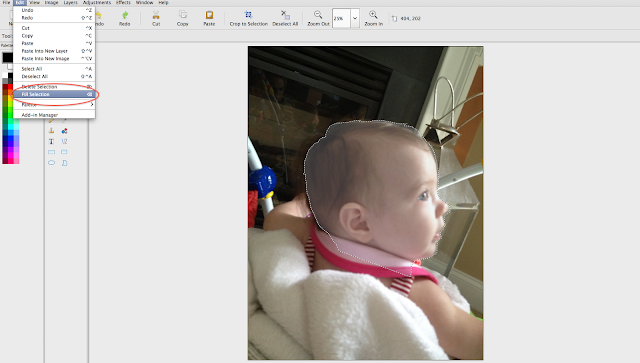
You can fill the selection with any color to make the silhouette any color you want, but I went with classic black.  To change the color just use the palette on the left hand side.


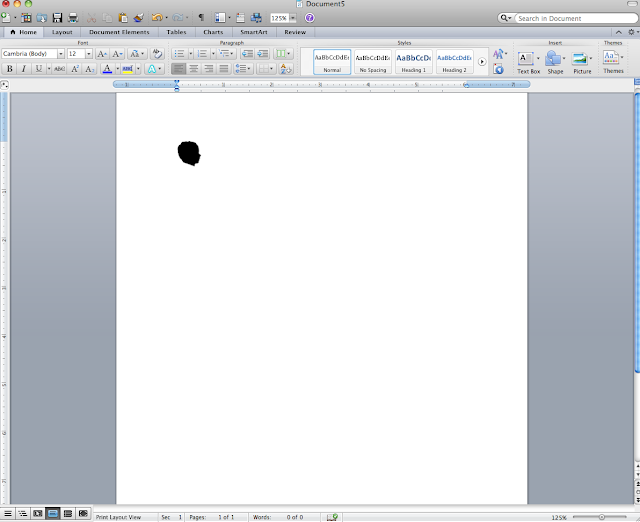
Once you've changed the color you will need to copy the image. (Edit - Copy; or Command C)  Then, Open a new image by clicking "New" up in the top left corner.  You will have a blank page like this.


Then you will paste your image using either Edit - Paste or Command "v"


You'll see it's a little rough around the edges because the image is slightly larger than the original.  If you want a larger silhouette to frame, it will need to be more precise, but if you are making a small silhouette for a necklace it won't matter because the image is going to end up being much smaller.  Nonetheless, I cleaned up the edges a little bit using the eraser tool.  


That's all there is to making the silhouette.  Now, you're just going to save it to the desktop.


Then, open up a blank document in Word or Pages (I used Word) and drag your image into the new document. 


Once it's in the document, you will just click it so you can resize it and make it smaller.  


You will see the box surrounding the image, click on one of the corners and drag it to make it smaller.  I made mine about 0.5" by 0.5"  When determining how big you want it for the necklace, keep in mind that the glass has a bit of a magnifying effect so it will actually appear slightly larger than it is.


Now you're done with this part, just print the image.  I printed mine on white cardstock.  You don't want to print it on regular printer weight paper because it will be too thin and the glue will bleed through.


Now, onto the necklace.  I ordered my supplies from this Etsy seller.  I chose this set because it came with ten pieces which would allow me to make several necklaces.  You can also pick up these supplies at Hobby Lobby or Michaels.  I think a variation in shapes and sizes would be nice too.


The other thing you will need is glue.  I used E6000 glue (from Hobby Lobby but they sell it several places).  


So once you've printed out your silhouettes, glue your glass pieces to the paper.  Just place a dab of glue in the center of the glass and then press firmly onto the silhouette making sure the glue spreads out evenly and you get out any air bubbles.  Press firmly for about 60 seconds.  Then, this is very important, wait about 24 hours for them to get really good and dry before you move to the next step.  Ask me how I know this is important?  Because I was being impatient and trying to do it all at once and the paper got too wet and I had to start over.  So, once they are good and dry, rough cut them so they will be easier to cut.  


Then, carefully cut around the edges and glue them into your metal bezel (apparently that's the fancy name for the metal piece)

Let them dry again and you're ready to wear your beautiful new necklace with pride!  I think these would make great gifts too.  


Tuesday

Flower Power

This project all started when I was cleaning out my closet.  I was getting rid of things right and left and decided to get rid of this shirt.  I bought it on major clearance and it just didn't fit me right so I never really wore it.  However, I loved the flower detailing on it and thought why not repurpose it into a fun, extra girly, onesie for my daughter.  

So I cut the flowers off


and used a little liquid stitch glue (got mine at Hobby Lobby) to attach it to a prewashed onesie


so easy


and my little one modeling it for you :)


You could use this same method for any embellishment you wanted to add.  I've found some adorable roseettes and trim at Hobby Lobby.  You could do this for any age, even adults.  

Monday

Almost There

Thank you to all of you who have voted for me so far in the Olioboard design challenge.  I'm down by 130 votes (which is a lot but still attainable!) but if each of you would just take a quick minute to vote I would be in the lead!  Even if you have already voted you can vote again (one vote every day), voting ends in 6 hours!  


Thanks so much!