Wednesday

Farmer's Market

I love this time of year because of all the wonderful fruits and veggies that are in season. Some of these are from my own garden and some are from the cute little farmers market down the road. I love going down there and supporting our local farmers. My friend gave me some fresh Rosemary and it's so nice and fragrant! I'm thinking of making a wreath with it. Hope you all are enjoying your summer so far!

Posted by Picasa

Monday

Lamp Making 101

I've had several people ask me for a lamp wiring tutorial so here it goes. I am not by any means a professional and this is simply the way that I do it. You can buy a lamp making kit at Lowe's or Home Depot for about $10. That would work just fine but I like to use lamps I have lying around or lamps I find at Goodwill for $2-$3. I usually buy newer ones that have the plastic part at top, instead of the gold metal part. Either one will work fine the plastic just seems sturdier and gives a cleaner look.

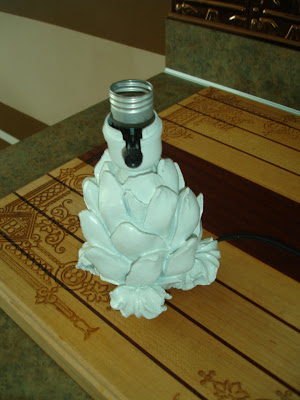
You can make a lamp out of anything, perhaps an artichoke?  I'm loving white artichokes right now, who knows why.  So, I bought these candlestick holders with the intention of spraypainting them white.  Then, it came to me, what a cute little lamp that would be!


So, I started out with this lamp from my garage.


You basically just start unscrewing it. Start at the top and unscrew and then unscrew the bottom part, etc. You will end up with something like this, give or take a few pieces.


Make sure you check and see that the lamp has the two little screws on it. Some of them are just wired directly into the socket and I have no idea how you do those. You run the wire through the threaded metal piece, screw the bottom plastic piece on and attach the exposed wire to the screws.


Then, you screw the top piece on, add a bulb and shade and you have a nice little lamp!  It's pretty easy to figure out, you basically just put it back together the same way you took it apart.


I love a little light to keep on in the kitchen and this one adds just enough.  I actually made another one just like it that I will be putting up on my Etsy shop whenever I finally open it :)  Happy Lamp Making!!  I'm not sure if I explained that the best, so if you have questions please ask.


Saturday

Corner Table

Due to popular request, I will be doing a lamp wiring tutorial in the very near future, but for today I have another before and after. I do apologize for the lack of blogging lately. Things have been very busy and I've actually been doing a lot more interior design work which has been wonderful. I had been looking for a small table for the corner of my dining room for a while now. Little did I know that it was right under my nose, cast away in my garage. My dad had bought it for me at Goodwill for $5 for another project but it didn't work out. I stumbled across it while organizing the garage and new it would be perfect. I wasn't crazy about the top so I took that part off, filled in the holes with some wood putty and got to painting. I wanted a little larger surface area on the top so I took a serving tray from my china cabinet and added it to the top. (it was less than a dollar at target during their after Christmas sale)

before...


after...

the shell was another Goodwill find (of course!) The color was kind of dated so I gave it a nice coat of Rustoleum Silver Metallic spraypaint.


Tuesday

Yes, another lamp...

OK, I admit it...I'm addicted to making lamps. In fact, I'm thinking about turning that addiction into something healthy like opening an Etsy shop. Hopefully more on that soon. Anyways, I spotted this finial in the clearance section of a local floral shop. I probably wouldn't have bought it, but it was $1.50! That's less than a cup of coffee, I couldn't pass that up. What was my first thought? Why not make a lamp? I was hoping it would be hollow and thankfully it was. I used a hand saw to saw the decorative portion off the top. I needed it to be flat. Then I drilled a hole in the top for the cord to come through.


Next, I taped it off to prepare for some fresh paint...


trimmed the edges with an exacto knife...


and put it all together! The lampshade was another goodwill find for $0.99 and I used parts and pieces from old lamps in my garage to wire it, so...I have a new lamp for $2.50! Can't beat that!


Sunday

Easy Canopy

Before our bedroom felt like it was lacking something. I liked everything in there, but just felt it needed a little more drama. I really like the wall quote that was above our bed, but I got it crooked when I applied it and it has always bugged me. I have been seeing lots of beautiful canopy beds with luxurious fabric and it got me thinking. First, I tried to convince my husband to let me find a four poster bed on craig's list but he didn't go for that. So, I figured I would just make a small canopy above the bed.

Here is what it looked like before...
and here it is now. I would love a beautiful chandelier in our room but the fan is definitly more functional and practical. Anyways, I just bought 2 curtain rods from IKEA for $7.99. I attached one to the ceiling and one to the wall. Then I hung four curtain panels on the rods (also from IKEA) and now for under $50 I have a canopy! You could of course make your own panels out of material, but these curtains were $14.99/pair. I don't think I could find material for that and then I would have to sew it too. I'm pretty happy with the way it turned out. It really adds a lot to the room and makes everything seem more grand.


Next on the list, I would like to make a platform for the bed so I can get rid of my bedskirt.  It drives me crazy!  Then,  I may add a padded insert to the headboard.  Who knows, I've always got a project up my sleeve! :)

If you need additional info with more specific instructions on how I hung this then check out this updated post with more instructions.  Thanks!

Thursday

another before and after...

I found this table at Goodwill for a steal. It also came with four chairs that I'm using for another project. I just loved the chunkiness of it and the lines of the pedestal base.

Here is the "before" picture, please excuse all the other junk in the picture. We were cleaning out the garage that day.


and after!! Some primer, a nice coat of black paint, and some poly to top it off! It still amazes me what a little paint will do! The chairs were also a DIY redo featured here.  It's always crazy to me when I look back at old pictures of the rooms in my house.  They are definitly always changing.


Wednesday

indoors out

I am all about bringing the outdoors in. I love using sticks, flowers, moss, stones, etc. in my decor, but I also love bringing the indoors out. We've been working on our patio makeover over the past few months, getting there slowly but surely. I wanted some sort of lighting element out there other than our porch light. I wanted to wire a chandelier out there but couldn't figure that out so I decided to use the next best thing, candles! Chandeliers are great indoors but they also add a little glam outdoors.

I started with this lovely brass chandelier ($3 at a local thrift store)


and I bought these would disks at A.C. Moore for about $0.69 each.


Then, I took the whole chandelier apart to remove all the wiring and tighten a few loose bolts.


Next, I nailed a nail in the center of each disk and used some epoxy to attach them to the chandelier.  The nails are there to help hold the pillar candles in place.

Now it's time to spraypaint. I just primed it and then used some Rustoleum Oil Rubbed Bronze spraypaint to match my patio set. I thought about doing it a fun bright color, but then decided against it. Maybe when it's time to repaint it I will go for a bolder look. Then I sealed it with some poly. Now, all that's left to do is have a garden party and enjoy it! So fun and easy!


Sunday

I'm back!!

Sorry for the lack of posting, I just got back from a wonderful vacation at the beach with my family and now I'm back and ready to blog. :)

Plant by plant, Row by row
Lord, please help my garden grow.

I saw this on a plaque in Cracker Barrel and thought it was cute. I actually thought about painting it on something and hanging it in my garden. Yes, I planted a garden. I'm not good with plants really, but this year I was determined to have a garden. I just think there's something so cool about eating things that you grew yourself. So far so good. Nothing is dead yet and some of the plants are even started to produce!

Here are a few of my herbs, Rosemary and spearmint. I also planted basil, chives, chocolate mint (they had me at chocolate :), and Stevia. The stevia plant is the one you see dead in the background. Well, it's not totally dead we've just had lots of rain lately and I think it drowned. Who knew? I guess too much water is not a good thing. I'm in the process of reviving it and I think it's going to make it. There wasn't a hole in the bottom of that pot but I didn't realize it, I think that's what caused the problem.


and here's the rest of my garden! Two blueberry bushes, a fig tree, squash, cucumbers, and tomatoes! People always ask me why I planted a fig tree, but I say why not! Plus, the lady said they were easy to grow, maybe that's why I did it...


I already have several tomatoes!